Unique Home Remodeling Projects For The Winter Months

Most Renovation and Design Firms Are Bullish

At least two-thirds of firms in the home remodeling and design industry entered 2018 expecting a good year for business, according to new research. However, firms are split on the future of the national economy, and two industry segments — architects and design-build — expect revenue growth to slow to a less rapid but still healthy pace

Most firms across industry groups are optimistic. tracks seven industry groups: architects, interior designers, design-build firms, building and renovation specialists, landscaping and outdoor specialists, decorating specialists, and building firms that include general contractors, remodelers and builders.

The majority of companies across all the groups rated their overall business outlook for 2018 as good (medium green) or very good (darkest green). Companies in the construction and outdoor industry sectors are particularly optimistic. For example, 42 percent of design-build firms rated their overall business outlook as “very good,” and 46 percent rated it as “good.”

High expectations for both revenues and profits. The majority of firms in all the industry sectors that tracks reported that they expect growth in both revenue and profits this year.

Among all the industry groups, architects were the most cautious about potential profit changes; this group had the lowest share of firms predicting increases (56 percent). Eleven percent of architecture firms said they expect profit decreases, the highest percentage of all the industry groups.


How Renovation and Design Businesses Fared

The numbers are in, and 2017 was another strong year for home renovation and decorating firms in the U.S., a new report from shows. Revenues (total sales) grew for at least three out of five firms across industry sectors, while profits grew for half or more across industry sectors.

Revenue grew for most. The 2018 State of the Industry study surveyed architects, interior designers, design-build firms, and building companies such as general contractors, remodelers and builders, as well as three types of specialty firms: building and renovation specialties, including pros such as carpenters and cabinet installers; landscaping and outdoor specialties, such as landscape architects and pavers; and decorating specialties, such as decorators and providers of window coverings

As this chart shows, four groups — architects, design-build firms, landscaping and outdoor specialty firms, and the building and renovation sector that includes general contractors, remodelers and builders — reported an increase in revenue growth during 2017.

This means that the pace of sales growth increased for these four industry sectors. For instance, the average revenue growth rate for architects was 8.3 percent in 2017, a rise from only 6.7 percent in 2016. Firms that focus on residential construction did particularly well in terms of revenue growth.

“The good news is that the demand for home remodeling far exceeds the prerecession levels in most parts of the country, driven by aging homes, aging population and recovered home equity,”


How to Use Texture to Zone Your Open-Plan Home

When you’re designing an open-plan room, it’s a good idea to think about how you’ll separate each zone. By being creative with the surfaces you use to decorate the walls, you can divide your living, dining and kitchen areas more effectively, adding warmth, interest and personality.

Opt for modern paneling. In this open-plan kitchen and dining room, the eating area is zoned with Valchromat, a manufactured material of recycled wood fibers that’s colored throughout. Valchromat is eco-friendly, strong, and comes in rich and vibrant hues, so it’s a great choice for paneling a room.

Add shelving. The texture on the wall of this living space was created simply by installing a wood shelving unit. The grid adds a tactile element to the plain white wall, giving the seating area a cozy feel. Its position is pretty clever too — it overhangs slightly to signify that this area is a separate zone.

Weave in bare brick. A good way to zone an area is to leave a wall exposed. This works particularly well in a living room, as a wall of textured brick or stone gives a snug feel to the space. Brickwork frames this wood-burning stove to add character and warmth to the seating spot and to separate it from the kitchen and dining zones.

Mix things up. The designers of this open-plan house used a number of materials to create an interesting layout of different areas. The sleek white paint in the kitchen contrasts with the cozy expanse of botanical wallpaper in the dining zone. The living area is intimate and calm, with a wall of exposed brick, and to the right is a child’s playroom, separated by a rope screen.


How to Divide an Open-Plan Space With a Half Wall

Is your preference for an open plan, but not quite? If you’re in favor of its spacious feel, extra light and views through to the outside but wonder how to subdivide the area, that’s where the half wall, or pony wall, can come in

As the following photos show, a horizontal or vertical mini wall can separate without enclosing to satisfy both a desire for a contemporary layout and a need for cocooning areas, a little privacy and a place to position furniture or hang things.

Draw a line. In this open-plan space, a half wall separates the sitting and dining areas so that the recliners feel anchored in the large space and the dining area feels distinct. The wall also creates a spot to display favorite items.

Warm both sides. The divider is vertical, rather than horizontal, in this home. Again, it creates more intimate areas within an open layout. The bonus is the inset fireplace, which is double-sided and a cozy focal point for this seating area and the one beyond.

Employ a multitasker. In this bedroom and bathroom space, the divider is a headboard that allows bathroom access to one side and leaves the draped ceiling visible. Notice how it’s fitted with a glass panel to let light through.


Do You Recognize These Common Side Effects of Remodeling?

Living through construction isn’t easy. Even if you’ve planned every last detail, the reality of having builders and decorators in the house for months on end can drive anyone slightly mad. Here are side effects of going through a renovation project, along with tips on how to come out the other side with your sanity, relationships and bank balance intact.

Expanding Your Project’s Scope

You started off simply updating your kitchen. Then, as the project took form, you decided you’d like to tackle your dining area as well. And your downstairs powder room. And your hall. The problem with improving one part of your home is that it swiftly throws into light how shabby the rest of your place looks in comparison. If you already have a competent team of builders, painters and carpenters across your threshold, it’s tempting to retain them for a few more weeks.

But this gradual increase in your project’s scope means you’ll inevitably require a bigger (possibly much bigger) budget. Falling prey to this common side effect also means your original schedule will need to be completely redrawn. Ultimately, it will leave you with no privacy for months and, in the worst-case scenario, in serious financial dire straits

Take a long, hard look at your bank account. Do you like eating? Being able to turn on your central heating? Unless you’re blessed with bottomless funds, then it’s a good idea to not get too carried away. As we all know, budgets have a habit of spiraling — and as your vision expands, this is going to get worse.

Obsession With Other People’s Houses

Although it’s great to find inspiration in a friend’s gorgeous home, it can also cause stress and panic, especially halfway through a project when you wonder if you have it all wrong and everyone else has it right.

Tile Roof Repair

Is it OK to walk on a tile roof?

Whether a structure has an asphalt shingle, metal, clay or concrete tile roof, walking on the roof for seasonal inspections and cleanings is inevitable. However, when it comes to tile roofs in particular, there is a proper way to walk on the tiles in order to avoid damage.

Often times, roof tile manufacturers do not specifically warrant breakage due to foot traffic, so it is important that caution be exercised when doing so. Not only do you not want to break your roof tiles, but you also do not want to put your safety at risk. It is suggested that you hire a licensed and bonded roofing contractor to do the job.

If you choose to perform the task yourself, it is recommended to step at the bottom three inches of the installed tile when walking along your roof. This section is supported by the lapped tile beneath it and the weight is then transferred to the deck below. Orient your feet in a direction parallel with the ridge and try to distribute your weight evenly, walking as softly as possible. On high barrel tiles, such as Eagle Roofing Products’ Capistrano concrete roof tile profile, you should distribute your weight with the heel and toe on the high points of adjacent tiles. If tiles are broken, you’ll want to have them replaced as soon as possible to avoid damage to the underlayment from water intrusion and exposure to the ultraviolet rays of the sun.

You will also want to stay away from hips or valleys to avoid breaking cut tiles that could be more difficult to replace. The exception to this would be in situations where the hips and ridges are bedded in mortar or foam, in which case they may be preferred walking paths. Valleys may also be access paths if the tiles are cut away from the center of the valley wide enough to allow foot traffic on the metal valley flashing.


Getting on Your Roof Safely

Wait until the tiles are completely dry before getting on your roof. Tiles have a flat, smooth surface so they don’t offer a lot of grip when you step on them. Once tiles get wet, they become even slicker and could cause you to slip and fall. If it rained recently or your roof is wet for any reason, wait 1-2 days so the tiles have time to dry before you stand on them.

Never get on your roof while it’s wet since it increases the likelihood that you’ll fall down.

Wear soft-soled shoes to prevent damage to the tiles. Avoid wearing heavy shoes or boots that have a hard sole since they’re more likely to break tiles and you won’t be able to move around as well. Look for shoes that have soft rubber soles with grips, such as sneakers or light work boots, so you get better traction on the tiles while you’re walking on them.

Don’t wear open-toed shoes like sandals or flip-flops since they don’t offer protection if you accidentally slip or fall down.

Climb a ladder to access your roof safely. Choose a ladder that extends 3 feet (0.91 m) taller than the edge of your roof so you can climb it safely. Place the base of the ladder ¼ of its height away from your home and make sure it’s on level ground so it stays sturdy. As you climb the ladder, maintain 3 points of contact at all times so you’re less likely to lose your balance or fall down.

For example, if you have a 16 ft (4.9 m) ladder, you would place its base 4 feet (1.2 m) feet away from your home.

Ask a helper to hold the ladder in place while you climb it so it’s less likely to fall down.

Warning: Avoid standing on the top 2 rungs of the ladder since you could easily lose your balance and cause it to fall.

Use a safety harness if you have a steep roof. Safety harnesses anchor you to your roof so if you slip, you won’t fall all the way down to the ground. Put your legs through the loops on the safety harness and tighten them around your thighs. Put the top of the harness around your waist and tighten it so it’s secure. Tie a rope around a sturdy object on your roof, such as a chimney, to use as an anchor to break your fall.

  • You can buy a safety harness online or from a home improvement store.
  • You can also make your own harness with ropes.
  • While you don’t need a safety harness for a roof with a gentle slope, you can still wear one if you want to reduce the risk of falling down.
  • If you don’t have a chimney or sturdy object on your roof, slide 2-3 tiles on your roof up so you can access the rafters underneath. Screw a harness anchor onto the rafters and tie the rope to it.


Where Should I Step?

Knowing where to place your feet when walking on a tiled roof will help to keep you safe.

The majority of concrete roof tiles will be slightly lifted from the roof’s surface as they sit on top of wooden batten strips. This creates a space beneath the tiles to allow for better ventilation.

When you step on the roof tiles, ensure you’re stepping on the tile peaks rather than the valleys, and step on the part of the tile which is reinforced i.e. the lower part of the tile you can see.

Whenever possible, there are some key precautions that you should take. If you have a harness, you should always wear one, and make sure to have someone with you at all times who can get help should you have an accident.


Walking on a Clay Tile Roof Can Cause Significant Damage

Besides the danger of walking on an uneven surface, it’s  easy to cause significant damage to your roof by walking on the tiles. If you weigh more than 100 pounds, the force of your weight alone can cause the tiles to crack and break. Clay, is fantastic for heat distribution and protection from the inclement weather during a  storm in Georgia, but it can be brittle. A little bit of weight distributed incorrectly can mean the different between a dozen tiles that need to be replaced, and a roof that looks great.  Of course, tiles breaking isn’t the only thing that can happen when walking on a clay tile roof. If the tiles weren’t installed properly, your feet could easily dislodge them, causing areas where rain or hail could potentially affect the underside of the roof.


Assess the Roof and Take Safety Precautions

If your roof has a steep pitch, you may want to avoid getting up there at all. Since clay and concrete tiles can break easily, you can also lose your footing easily and wind up injuring yourself from a fall. You may just want to save the trouble and call a professional if dealing with a sharper incline.

Wear a basic harness with climbing rope as well if you have it, just in case you do slip, and have an assistant nearby with a phone readily available so you aren’t alone if you do sustain an injury.

Find Your Path

Barrel and S-shaped tiles are costly to replace and can’t sustain weight very well, so it’s important that you have an idea of how to proceed before you ever set foot above.

There are a couple of different things to keep in mind. Roofing tiles usually aren’t backfilled, so there is no support underneath to take your weight. As such, do not step in the middle of a tile or it will definitely break. A better area to place your feet is actually where the bottom of one tile overlaps the top of another. This is a much stronger section that will be able to hold weight more reliably without incident. So, when you begin walking across your roof, make sure you take the most direct route to where you need to go and carefully make sure each step falls in the right spot.

Also, make sure that you keep an eye out for and avoid any tiles that appear to already be damaged. This may seem obvious, but even something as small as a hairline crack could cause the tile to break under your feet regardless of what you do to avoid it.

Distribute Your Weight

Another important thing to remember is that you will need to distribute your weight evenly between both feet. Whether you’re walking or standing as you conduct your work, make sure to stand on separate tiles as well.

Inspecting Used Transmission Repair Truck

What Kind of Equipment Does an Auto Mechanic Use?

The job of an auto mechanic has become increasingly specialized in the 21st century. Until the 1960s, all you needed was a good wrench set, a strong pair of pliers and a couple of sizes of screwdrivers and you could repair most cars. Modern cars are much more evolved, with hundreds of computer chips and solid state electronic parts. It requires specialized equipment to diagnose problems with these sophisticated electronic devices, and auto mechanics today have to learn how to use modern electronic diagnostic equipment as well as all of the traditional tools of the trade.

Hand Tools

Hand tools are still an essential part of an auto mechanic’s tool set. All commercial garages have pneumatic wrenches to make life easier, but hand wrenches or pliers still need to be used in tight spots. A screwdriver set, including flat and Phillips heads, is also a requirement for auto mechanics. Auto mechanics also regularly use grinders, lathes and measuring tools such as micrometers and pressure gauges.

Specialized Auto Part Tools

Mechanical and digital micrometers are commonly used in mechanical engineering applications, and a specialized digital brake micrometer for automobiles has also been developed. Other specialized auto part tools used by mechanics include tire pressure gauges, oil filter wrenches and cutter tools, steering wheel lock plate tools, clutch alignment tools, strut spring compressors and spark plug sockets and gauge tools.


Welding Equipment

Welding is required in a range of auto repairs, and flame-torch cutting is also used to remove and repair exhaust systems. Most auto welding involves MIG or flux-cored arc auto body work, or spot or stud welding, where a bolt or weld nut is welded to another metal part. Sometimes auto mechanics have to use a spot weld cutter to remove old spot welds.

Lifts and Hoists

Auto mechanics also use a variety of lifts and hoists to give them access to the area of the vehicle that needs to be repaired. Most large garages have pneumatic lifts that raise cars to the appropriate level. Private mechanics might use hoist systems or jacks, or even just an auto dolly to roll under the chassis.

Electronic Diagnostic Equipment

Modern auto mechanics use a variety of electronic diagnostic equipment to help them determine the exact cause of a problem. Most of these diagnostic devices are hand-held or portable on wheels. Mechanics compare the data produced by the diagnostic equipment to the standards provided by the manufacturer. This enables mechanics to accurately diagnose problems based on the latest information downloaded from manufacturer databases


Can Mechanics Keep Up With Car Technology?

Tinkering with your car has always been a good way to void your warranty, but pop the hood on a motor vehicle today and you might not even know where to begin. Whereas auto repair was once viewed as the rough-and-tumble profession of under-educated “grease monkeys,” today’s auto technicians are closer to computer hackers than blue-collar wrench hands.

The challenge of technology is nothing new for modern auto mechanics — there have even been laws passed to keep small-time mechanics in business as the role of technology increases. What then, does this mean for would-be professionals, young people interested in the profession? It’s a different path to the garage floor today.

Wrench? What’s That?

We’re living in the age of the self-driving car, and while it could be a few years until we see fully automated roadways, the technicians who work on those cars are being trained today.

Which skills does it take to make a modern mechanic? How about engine computer unit (ECU) management, metrics analysis, and stoichiometry? Not what you might think of when you take the family car in for an oil change. Don’t be misled: You’ll still need to know how to break loose a rusted lug nut if you plan on making a career as a mechanic, but now you need a number of additional skills.

As compared to the old-world approach of apprenticeship, most modern mechanics start their careers in a program at a school like Universal Technical Institute (UTI). These institutions allow students to pursue employment specific to a manufacturer. For example, a graduate specializing in work on Ford cars is about 60 percent of their way to earning the title of master mechanic at Ford Motor Co.

In Demand

The upside of this new challenge for auto technicians? Increased demand and better incentives for young people. Repairing cars is no longer viewed as a profession for those who may not be college-bound. Instead, it’s a viable profession, and the industry is seeking help. So while the workplace may be evolving, the job isn’t going away.

It’s not just the common car that has become more technical, either. Semi-trucks may not drive themselves just yet, but finding technicians who can keep up with the ever-changing technology can be one of trucking’s biggest challenges. This creates a demand for more specialized jobs for graduates of UTI and other trade-specific institutions.

A Promising Future

The future is no easy road, and with network technology becoming more integrated in modern cars every day, tomorrow’s technicians will need to add skill sets like Bluetooth and the Internet of Things (IoT) to their repertoire.

With manufacturers, dealerships, and smaller repair operations all seeking help, the median wage for auto technicians has increased significantly from around $41K/year, which the Bureau of Labor Statistics reported in 2009. Specialized technicians who work on commission can even achieve six figures if they work quickly and effectively.

So can mechanics keep up with new car technology? With the right training and education, it seems the answer is yes.


Automotive Mechanics

If you have a passion for cars, you may want to consider a career as an automotive mechanic. Keep reading for more information on training programs and employment prospects in this field.

Inside Automotive Mechanic Careers

An automobile consists of many unique components. Automotive mechanics know the workings of all of these parts, including engines, brakes and car accessories. They also help drivers check and change fluids, spot potential problems and fix breakdowns or failures. By keeping a car or light truck in its best possible shape, mechanics can help car owners avoid spending more money on a new vehicle. If you think the automotive mechanic profession may be right for you, Study.com can help you take the next step. Check out the links to education, career and certification information provided below.

Education Information

According to the U.S. Bureau of Labor Statistics (BLS), automotive technology is quickly becoming more advanced, and many employers prefer mechanics who have completed a formal training program in high school or in a postsecondary vocational school. Automotive mechanic certificate programs can teach students how to diagnose and solve problems in many different parts of a vehicle, including fuel, lighting, transmission and ignition systems.


Other Skills Required (Other qualifications)

The ability to diagnose the source of a problem quickly and accurately requires good reasoning ability and a thorough knowledge of automobiles. Many technicians consider diagnosing hard-to-find troubles one of their most challenging and satisfying duties. For trainee automotive service technician jobs, employers look for people with strong communication and analytical skills. Technicians need good reading, mathematics, and computer skills to study technical manuals. They must also read to keep up with new technology and learn new service and repair procedures and specifications.

Training in electronics is vital because electrical components, or a series of related components, account for nearly all malfunctions in modern vehicles. Trainees must possess mechanical aptitude and knowledge of how automobiles work. Experience working on motor vehicles in the Armed Forces or as a hobby can be very valuable.

Tips Beginner Wedding Photographer Should Do To Stay Ahead

MOST IMPORTANT THINGS TO COMMUNICATE TO YOUR WEDDING PHOTOGRAPHER TO ENSURE YOU LOVE YOUR PHOTOS

Making sure you and your photographer have set your big day up for success is hugely important to getting all those images you’ve envisioned. They way to do this is: communication. Communicating all the details, and what you both expect is super important to how you feel about your wedding images in the end. Expecting something to go one way when it wasn’t communicated to your photographer can lead to upset feelings and trust me no photographer wants to disappoint their clients. I have found there are many important things to communicate with your photographer leading up to your wedding but here are the top things I think are most important to flesh out in oder to get all the photos you are looking for.

Your timeline- more importantly padding your timeline

Being on the same page about when things are starting, or important moments are happening are the most important reason to be very clear on your timeline. However there is something else that’s important to add to that timeline-padding. I don’t think I’ve ever shot a wedding that was 100% on time, I’ve even had weddings where there ended up only being 10 minutes for bride and groom photos instead of the planned 30 minutes because it was running that far behind. Not padding in enough extra time to the timeline can lead to a lot of stress for you, and your photographer and also lead to not getting all the shots you wanted. I suggest adding at least 30-45 minutes more than you think you need to the getting ready part of the timeline. This is usually where things start to fall behind. Tell your hair and makeup team they need to be done at 10:30 even if photos aren’t till 11:00-this way if they go over there’s still some time; and if they do finish on time this will allow you to hang out with your friends and family rather then stress about how late your running. As photographers we can only work with the time we are given, we want to make sure you get the best photos possible so padding that timeline will help everyone in the end!

List of names and relationships for family photos

Having this list during the family photos is very helpful to keeping this part running as smoothly and efficiently as possible. Most guests want to be enjoying cocktail hour during this time so getting these photos done as quickly as possible will benefit your guests, and ensure that you get all the time you planned for bridal party and bride and groom shots. Being able to just go down a list and call out names is much easier than trying to wing it the day of. So make sure to write it out like this

Shot list of important pictures unique to your wedding

As wedding photographers we know the important moments to look for and capture at a wedding. Things like the first kiss, cake cutting, first dance are all a given. However if you want to make sure you get a photo of all your sorority ladies and you together then you should share that with your photographer, or is there a certain spot at your venue you absolutely must have photos done? Share that! That way we can add it to the list of shots we need to get to ensure you are thrilled with your photos and not bummed that a certain shot wasn’t captured


THINGS TO CONSIDER WHEN PLANNING YOUR WEDDING PHOTOGRAPHY

Wedding planning can be both exciting and stressful at the same time. Lots of details should be considered, from the colour of napkins to the music being played and the food that is being served. The photos from your wedding will be your best memories of a very special day in your life, so its important that they’re done right.

Consider the weather for each season

When deciding on what season to get married in, here are some considerations you should take for the weather

Spring

Cons: Can be very rainy and possibly rain all day. Can be damp and cool. Usually the leaves have not come out on the trees until the end of May causing there to be less “open shade”. The lack of leaves can cause the light to be very stark and the backgrounds may have a lot of branches coming out of people’s heads.

Pros:  Pretty blooms of Red bud trees and Magnolia- unique to spring time.

Summer

Cons: July can be extremely humid sometimes!  Not a great month for people who are really sensitive to extreme heat.  It’s especially important to pick a photo location with a lot of shade.

Pros: By far, June- September is usually Ontario’s most pleasant weather.

Winter

Cons: Not every day has a pretty dusting of fresh snow. Usually a bride and groom can get outside for a 20 minute portrait session, but it’s necessary to have a good indoor location to complete all the family photos.

Pros:  You can sometimes get a “Winter Wonderland” day that is magical looking.

Have a backup plan for bad weather and light conditions

Rain, hail, high winds or snowstorms may cause unexpected problems on your wedding day. The bottom line is it’s critical to have a Plan B option for photos to account for difficult weather and light conditions.


Things in Mind When Choosing a Wedding Photographer

Once you’re engaged, one of the first tasks you’ll want to check off the list is choosing a wedding photographer! As the person responsible for documenting all the memories of your #bestdayever and delivering images you can look back on for years and years, it’s an important decision, no doubt. Not sure where to begin or exactly what to know when choosing a wedding photographer? We’ve got five helpful tips to guide you through the process.

Know what you’re willing to spend.

Quality wedding photography is not something to skimp on. Often, photography (and videography) can end up being one of the largest single expenses of your entire wedding. You can expect an experienced professional wedding photographer to charge anywhere from $2500 all the to way to $10000 and beyond. Packages vary, but remember their prices factor in not only their creative talent and honing of their craft, but their equipment costs, travel time and many, many hours of preparation and editing in addition to the time they’ll spend actually photographing your day.

Decide which style you feel most drawn to.

Photography, like any art form, can vary immensely from artist to artist. It’s up to you and your fiancé to decide which artistic style you like best, and let that heavily influence your decision. Are you drawn to fine art photography? These photos tend to have more muted colors, less contrast, more brightness and cool tones. You’ll tend to see more posed, “still life,” artful shots. Often, fine art photographers use film to help achieve this distinct look. Because film has been around for generations, these photos will definitely stand the test of time, but film is also more expensive to shoot and requires a different skill set than digital photography, so you can expect to pay more for someone who incorporates film into their work.

Do your research.

When it comes to narrowing down your short list of photographers, you’ll want to rely on word of mouth (who have your friends used and loved? what are reviews saying?), Instagram (remember to use location-based hashtags to your advantage) and local photographer listings on resources

Be clear with your goals.

Do you want these photos to be published in a magazine or online publication? Do you NOT want them to be published or shared? It’s important for your photographer to know these things ahead of time. It’s also a good idea to let them know which types of shots are most important to you – not specific poses or copies of photos you’ve found on Pinterest, but do you care more about the details, the candids, the family shots, the portraits of just you two?


Things Wedding Photographers Want You to Know

We can say without a doubt that your wedding photos are going to be the BEST reminder of one of the most amazing days of your life. Long after the wedding cake is eaten, your wedding dress is put away in storage, and all your thank you notes are mailed out, your wedding photos are going to be what you look back on to relive all those sweet, fun, and joyous moments from when you said “I Do” to the partner of your dreams.

That’s why wedding photography is often one of the most important parts of a bride’s plans. But finding the right wedding photographers in a sea of talented artists can be overwhelming, and figuring out details like hours, style, and specific shots can be an exhausting addition to an already stressful day. Add on top of that the fact that your wedding photography will most likely be one of your biggest budget items…well, it’s a lot to think about!

You get what you pay for. At the end of the day, wedding photography is like most things—the cost you pay oftentimes reflects the quality you receive. Wedding photography is a lot more than pressing a button on a camera; it’s expensive equipment, hours editing, and multiple shooters. If a photographer’s low price seems too good to be true, it probably is! If you need to save money on your wedding photographer, consider prioritizing your timeline for them to attend fewer hours or putting photography on your wedding registry. Get more wedding budget tips here!

They want to help with your timeline. Many wedding photographers have been to literally hundreds of weddings. They’re experts! Letting them help plan your wedding timeline ensures you’ll have a smooth event with lots of time for photos. They can often provide tips on details like how early you should start getting ready and whether or not to have a first look.

Having an unplugged wedding may be the best decision you ever make. It seems fun to scroll through social media with your new spouse in the morning checking out photos from your wedding, but allowing guests to snap 8 million shots of the ceremony can be a photographer’s worst nightmare! Guests often don’t recognize the fact that a paid photographer is taking photos and can jump in the way of important shots. Consider asking guests to put their mobile devices and cameras away during the ceremony.


The best wedding photography tips for capturing the big day

Whether you’ve already shot a wedding (or three, or 33) and are looking to improve your work, or are debating dipping your toes in the water, we’re here to help you take your work to a whole new level with wedding photography tips for newbies and pros, alike.

Understand the business side of things

If you’re looking to do more than a one-time gig as a favor for a friend, one of the biggest mistakes you can make as a photographer is to go into wedding photography without a solid business plan. First and foremost, no matter how close you are to the bride and groom, have a contract ready to sign

Having a signed contract ensures you and the couple are protected in the event something doesn’t go as planned. It doesn’t take much Googling to see numerous examples of photographers and couples clashing in court because of a miscommunication that wasn’t backed up in writing.

Payment is another thing to keep in mind. It’s easy enough if your fee is going to be paid via cash or check, but make sure to have clear guidelines in your contract about when final payment must received and what your cancellation policy is. If you’re going to be paid online or via credit/debit card, make sure you have the appropriate accounts set up through your payment provider. Keep in mind, you’ll also want to set aside some of your income when tax time comes around, as you’ll likely have to pay income tax plus self-employment tax, depending on the state you’re in.

Know every piece of your gear

There’s no such thing as knowing too much about your equipment. It isn’t so much about having the right equipment as it is knowing how to use what you have. The better you understand the features and limitations of your gear, the easier your shoot will be. Know which lenses you’ll need in which situations, how long your battery will last (and how many spares you’ll need), and how many photos you can fit on a memory card.

The Pros Plastic Surgery Of Cheek And Chin Implants

What should you avoid before plastic surgery?

The Number One Thing to Avoid Before Surgery

No smoking! This unhealthy habit is particularly dangerous during the weeks before and after surgery. Nicotine constricts blood flow and can dramatically affect both your surgery and your body’s ability to heal. Popular smoking cessation products such as nicotine gum, e-cigarettes, and nicotine patches are equally dangerous: the nicotine in these products is what complicates surgery and the healing process. Avoid all forms of nicotine at least one month before and after surgery.

Foods to Avoid Before Surgery

shutterstock_109517018This may be surprising, but there are a handful of healthy foods that can have a negative impact on surgery and healing. You should cross the items below off your shopping list before surgery:

  • Green tea is touted as an antioxidant powerhouse, but this popular brew can also interact negatively with anesthesia, increase blood pressure, and cause accelerated heart rates. Stop drinking green tea at least 10 days before surgery, and be sure to ask your doctor when it’s safe to ingest again.
  • Fruits and vegetables are typically a staple in a healthy, well-balanced diet, but not when you’re preparing for surgery. During the 24 hours before surgery, I tell my patients to avoid foods that are high in fiber. Fruits, vegetables, and whole grains take longer to digest, and it is important to have as little food as possible in your system before surgery begins.
  • Certain beverages, both alcoholic and nonalcoholic, can impact your surgery. Choose clear drinks, such as water, during the 24 hours before your procedure. As you prepare for and recover from surgery, you should avoid alcoholic drinks altogether.

Supplements to Skip Before and After Surgery

Patients should be aware that a number of vitamins and minerals can negatively impact recovery. Here are some common supplements to avoid leading up to and following surgery:

  • Vitamin E is a blood thinner, which can complicate your surgery, negatively impact your wound healing ability, and increase risk during recovery. Be sure to also avoid multivitamins that contain vitamin E.
  • Fish oil supplements are a great source of Omega-3 fatty acids that provide numerous health benefits. Unfortunately, they can also increase bleeding and bruising and should be avoided in the days leading up to surgery.
  • Herbal supplements, like gingko biloba, can increase your risk of bleeding during and after surgery. St. John’s wort can prolong the effects of anesthesia, and even mild supplements like echinacea can have a negative impact on the safety of your surgery.

To ensure a safe and successful outcome, it is essential that you tell your surgeon about any over-the-counter supplements or prescription medications you take. Almost anything purchased at the health food store has the potential to increase the risk of bleeding during surgery. Do not take any over-the-counter medications or supplements, with the exception of Tylenol, for two weeks before and after surgery without first consulting with your surgeon.


What to Eat Before Surgery

Plastic surgery is typically scheduled weeks or months in advance. You can use this to your advantage by increasing your intake of foods that have the nutrients your body will need for recovery. For example, be sure to eat plenty of:

  • Protein: Protein is the essential nutrient in the creation of new blood cells and collagen. Collagen is the building block for skin, muscle, tendons, and bones—all of the physical structures that need to heal after surgery. Protein is also vital for a strong immune system. Women should aim to eat 1.2 grams of protein per kilogram of body weight per day. That means a 120 pound (54 kilogram) woman should take in about 65 grams of protein per day. Men’s protein needs are typically higher at 1.5 grams of protein per kilogram of body weight per day. For example, a 150 pound (68 kilogram) man should take in about 102 grams of protein per day. Foods like fish, eggs, chicken, turkey, beef, tofu, low-fat yogurt, nuts, quinoa, and beans are all good sources of protein.
  • Fruits and Vegetables: Eat fruits and vegetables that are high in vitamin A, vitamin C, selenium, and manganese. All of these nutrients fight what are known as free radicals. Free radicals appear in your body as a natural response to stress (like surgery) and can cause tissue damage and slow the healing process. You’ll find vitamin A in kale and spinach, and vitamin C in citrus fruits and green peppers. Mushrooms, cabbage, and spinach contain plenty of selenium. Raspberries, pineapples, and bananas are all good sources of manganese. In general, if you’re eating a variety of colorful fruits and vegetables each day, you can be sure you’re getting the nutrition you need.
  • Water Drink at least 64 ounces of water a day. 80 to 100 ounces is even better.


Why Nutrition Matters Before And After Plastic Surgery

Swelling and inflammation are the body’s natural response to physical trauma. They occur due to the body sending an increased amount of blood to the trauma’s site. The blood carries with it platelets and other nutrients that help the site heal itself. That said, there is such as a thing as too much swelling and inflammation. Heavy swelling and inflammation result in pain and can hinder healing. Common home remedies include elevation and icing. Elevation places the swollen area above the head to discourage additional blood flow. Icing calms irritation and soothes pain. A severely underestimated remedy is one that prevents excessive swelling and inflammation before they occur. That remedy is your diet. Various foods provide the body with their own nutrients or, sometimes, with their own grime. What you eat has a signification impact on your blood pressure, your weight, your body’s functionality, and your mood. Because food wields such great control over your body, it also determines how it responds to trauma.


Here are a few reasons why being prepared can make a difference:

  1. Maintaining balance

Monitoring portions keeps patients on track without eating too much or too little. “We appropriately portion our meals — each meal is about 400 calories and the snacks come in at about 200 calories — so you don’t have to worry ‘Am I eating too much?’ and can just take pleasure from your food,” Boncompagni says of Eat Sunny. Rather than focusing on what you are cutting out, focus on what you are gaining through micro and macronutrients.

  1. Saving time & energy

With everything going on in our day-to-day lives, food often becomes an afterthought. But nutrition cannot be overlooked. Following a meal plan or prepping food in advance will save time and energy during the recovery process, when preparing food from scratch may prove difficult.

  1. Instilling healthy habits

Before a procedure, unhealthy habits (think: smoking and drinking) need to be curbed in favor of good ones. Having a plan in place — pre- and post-op — should help the patient to stick to healthier choices long term. After all, the outcome of the procedure depends on it.


Miracle Foods to Eat Before Cosmetic Surgery

Do you have an upcoming surgery? If so, you may just want to add these five foods to what you’re eating. Loaded with the nutrients you need to help make your surgery a success and your recovery a breeze, you’ll definitely want to stock up in the weeks leading up to your big day.

spinachSpinach

Mom was right to nag you about eating your spinach. It’s truly one of the most beneficial foods that any of us can incorporate into our diet. And pre-surgery, it offers even more value! Besides being packed with vitamins A, B2, B6, K, and folate, it also contains ample amounts of iron which can increase blood volume and help reduce recover time.

Beans

A serving of beans packs a tremendous protein punch that can help keep your blood sugar in check and your energy levels high – definitely important in the days leading up to surgery. Beans are also an excellent source of fiber which can help prevent post-surgery constipation.

Pineapple

Yum! This pre-surgery food is our favorite! Pineapple contains a proteolytic enzyme called Bromelain which has been scientifically proven to both prevent and reduce swelling. Often recommended to those who suffer from athletic injuries and arthritis, it also offers health benefits to individuals undergoing surgery. So, why not toast your upcoming procedure with a big glass of pineapple juice?

Beets

That often overlooked purple vegetable hiding at the salad bar actually delivers a host of nutritional benefits including the amino acid l-glutamine which can help reduce healing time by improving nitrogen balances and improving lymphocyte recovery. And, they really do taste good!

Oysters

How about some oysters on the half-shell? Oysters are one of the best sources of zinc – a natural wound healer. And, this miracle mineral also stimulates the immune system and improves stress levels. Both delicious and beneficial!

The Pros And Cons Of Offshore Merchant Accountant

WHAT CAN YOU DO WITH AN ACCOUNTING DEGREE?

If you are someone who needs to follow a plan rather than applying for jobs willy nilly, then you have come to the right place. It might be helpful to know that we have created a career path map for Accounting majors to use to find career paths that they might have not thought about before. The map is a helpful tool to discover the career potential of your major.

BEST JOBS FOR ACCOUNTING MAJOR

If you recently graduated from college and are having a hard time finding a job, you are not alone. Luckily enough, we set out to help graduates with an Accounting degree to find the perfect job. After looking through 232,971 Accounting major resumes and millions of job listings, we were able to find which are most preferred jobs by Accounting major graduates.

Accountant

Accountants and auditors prepare and examine financial records. They ensure that financial records are accurate and that taxes are paid properly and on time. Accountants and auditors assess financial operations and work to help ensure that organizations run efficiently.

Finance Analyst

Financial analysts provide guidance to businesses and individuals making investment decisions. They assess the performance of stocks, bonds, and other types of investments.

Staff Accountant

Accountants and auditors prepare and examine financial records. They ensure that financial records are accurate and that taxes are paid properly and on time. Accountants and auditors assess financial operations and work to help ensure that organizations run efficiently.


What is Accounting and Why is it Important For Your Business?

A simple definition of “accounting”

Accounting is how your business records, organizes, and understands its financial information. You can think of accounting as a big machine that you put raw financial information into—records of all your business transactions, taxes, projections, etc.—that then spits out an easy to understand story about the financial state of your business.

Accounting vs bookkeeping

Accounting and bookkeeping overlap in many ways. Some say bookkeeping is one aspect of accounting. But if you want to break them apart, you could say that bookkeeping is how you record and categorize your financial transactions, whereas accounting is putting that financial data to good use through analysis, strategy, and tax planning.

The accounting cycle

Accounting begins the moment you enter a business transaction—any activity or event that involves your business’s money—into your company’s ledger. Recording business transactions this way is part of bookkeeping. And bookkeeping is the first step of what accountants call the “accounting cycle”: a process designed to take in raw financial information and spit out accurate and consistent financial reports.

The accounting cycle has six major steps:

Analyze and record transactions (looking over invoices, bank statements, etc.)

Post transactions to the ledger (according to the rules of double-entry accounting)

Prepare an unadjusted trial balance (this involves listing all of your business’s accounts and figuring out their balances)

Prepare adjusting entries at the end of the period

Prepare an adjusted trial balance

Prepare financial statements

Financial statements

Financial statements are reports that summarize how your business is doing, financially. There are three main types of financial statements: the balance sheet, income statement, and cash flow statement. Together, they tell you where your business’s money is, and how it got there.


Accounting Terminology Guide

A Misstatement is Inconsequential

If a reasonable person would conclude after considering the possibility of further undetected misstatements that the misstatement either individually or when aggregated with other misstatements would clearly be immaterial to the FINANCIAL STATEMENTS. If a reasonable person could not reach such a conclusion regarding a particular misstatement, that misstatement is more than inconsequential.

Abatement

Complete removal of an amount due, (usually referring to a tax ABATEMENT a penalty abatement or an INTEREST abatement within a governing agency).

Absorption Costing

An approach to product costing that assigns a representative portion of all types of manufacturing costs–direct materials, direct labor, variable factory overhead, and fixed factory overhead–to individual products.

Accelerated Depreciation

Method that records greater DEPRECIATION than STRAIGHT-LINE DEPRECIATION in the early years and less depreciation than straight-line in the later years of an ASSET’S HOLDING PERIOD.

Account

Formal record that represents, in words, money or other unit of measurement, certain resources, claims to such resources, transactions or other events that result in changes to those resources and claims.


Tips & An In-depth Process To Choose A Perfect Accounting Software

If you have a business, you need an accounting software to record your income and expenses. Ideally this is the first piece of software you should purchase when you start the business. However, most business owners get one only when they need to pay taxes or apply for loans.

So, how to choose a right accounting software for your business? This can get confusing as there are plenty of products available in the market today. I’m trying to make your job easy by listing down some important filtering criterias that you should consider before you invest in an accounting system.

Online or Offline

First question to ask yourself is – Whether I want an online software or a desktop based offline software? How does it matter? Well, most businesses nowadays are adopting cloud based softwares as they offer lot of advantages over traditional offline softwares. However, some businesses like retail stores require speed and not always connected to the internet. For them, offline POS (Point Of Sale) systems are the best bet.

Advantages of Cloud Accounting Software:

– Nothing to install. Just signup and start entering your transactions

– You don’t have to worry about upgrades as all changes are pushed automatically. Online softwares are always up to date.

– Can be accessed from any internet enabled device at any point of time

– Cloud accounting software providers take care of backup and maintenance which is a cost saving for you.

– Data across all your offices is always synchronised.

– It can integrate with other cloud based applications.

When you should buy an offline or desktop based software:

– You have a retail store and need to create few hundred invoices over the counter.

– You do not have internet connectivity at your business location.

Its strongly recommended that you go for an online accounting software as you will have your financial data on your tips even when you are not in the office.


Why Business Writing is Important For Accountants

Accountants do many things, but ultimately, they help make people’s lives more manageable. From filing taxes to regulating payroll for a small business, accountants work wonders for their clients. While crunching numbers, technology implantation and tax compliance (and more!) are all part of their job description, writing is another skill excellent accountants should possess.

Communication Skills

Excellent teamwork goes hand in hand with excellent communication. Accountants often have to work with other departments or firms to fulfill their duties. In this case, excellent communication skills are essential. Not to mention, a huge chunk of business communication happens via email these days. When financial assets are involved, written proof is always necessary. It’s important for accounting professionals to be able to discuss these matters in an articulate and clear way.

Of course, that means that emails remain on file for further reference. This alone should be enough of a motive to keep writing skills sharp. Furthermore, regular written correspondence with clients help builds trust in that relationship. When someone gives their writing that personal touch, it’s apparent in even the most transactional email. Colleagues and clients alike will take note of effective email writing.

Job Retention

Accounting firms have raised the bar on what they expect from their employees. In fact, prospective accountants usually have to complete written and oral exams during the hiring process. Poor grammar could quickly get a rookie accountant the boot. Indeed, plenty of dismissals happen on account of poor writing skills. A large number of firms report this as a reason for job termination.

Common Writing Tasks

Accountants have plenty of writing they need to do frequently. First of all, there are technical documents like analysis of business performance or financial reports. While this kind of writing tends to be packed full of data, there should be a clear explanation. Management and clients have to be able to understand these documents, too. Failure to properly communicate can lead to trouble and misunderstandings.

What To Do If Your Home Inspection Has Sustained Flood Damage

How to Make the Most of Your Home Inspection

You’ve searched and searched, and you’ve finally found it: your future home. It’s perfect — at least as far as you can tell, anyhow. But while having your offer accepted will be the first official step toward homeownership, there’s another crucial step you’ll need to do before you start packing boxes and picking out paint swatches — you need to get a home inspection for your potential abode.

A home inspection may not be the most exciting way to spend a few hundred bucks, but it’s one of the smartest investments you can make. Home inspectors are trained to spot potential snags that could lead to costly repairs down the road. And if you catch those issues before you’ve moved in, you may be able to get the seller to help you cover the cost of fixing them, which could save you a lot of money in the long run. Here’s everything you need to know about getting your home inspected.

Choosing an Inspector

You may be tempted to do a DIY inspection or enlist a handy friend to scope out the house, but hiring a professional is the best bet. Home inspections typically cost between $300 and $5001, but don’t let price be your deciding factor — it’s worth paying a little extra for an experienced inspector with a stellar reputation. After all, a thorough inspection could save you thousands of dollars if a major issue turns up.

Scheduling Your Home Inspection

Your contract will most likely mention a “due-diligence period,” which is the amount of time you’re given — typically around 10 business days — to get your home inspected. That may not seem like much time, but inspectors are used to the time crunch. Just contact your home inspector as soon as possible, and try to choose a time when you’re available to tag along. You’re not required to be there, but it can be helpful to see any trouble spots in person and ask questions.

What Your Inspector Should Look For

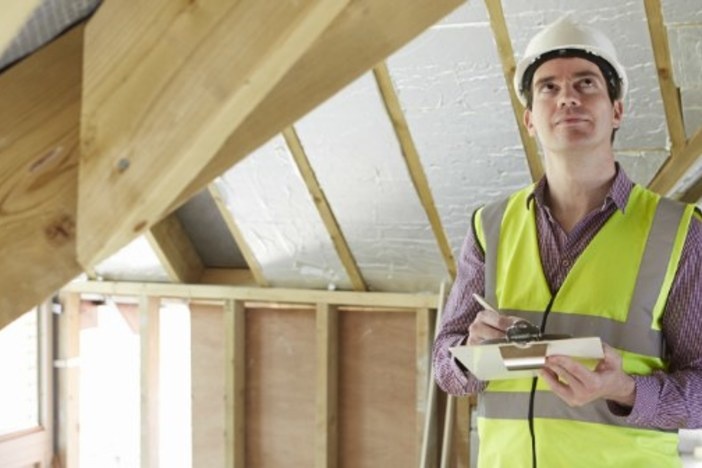
Not only will a home inspection help you protect your investment, but it’s also a perfect opportunity to get acquainted with your future home. Your home inspector should walk around outside to make sure the foundation, roof and siding are in good shape and water drains away from the house. Inside, they should check the plumbing, test the outlets, open and close every window, heat up the oven, run the air conditioning, inspect for evidence of termites, look for any ventilation issues and more.


Hiring a home inspector? Here are things to remember

The more she looked for problems, the more she found them. Studs had rotted. The one wall in the basement that was covered in drywall when she bought the house turned out to be in even worse shape.

It was only the beginning. A contractor started to repair the foundations and vanished, but not before starting a fire which made the house uninhabitable. Marchuk successfully sued him, but the settlement is coming in slowly on an installment plan.

“When I listed it in in 2013, somebody was interested, and got a home inspection with a different company. He said the house was shifting — you can tell by the roof that it’s kind of caving in on one side. The two inspections, if you compare them, are just night and day. Theirs was more thorough, and had drawings of how the house was shifting, and that the foundation is failing, which that home inspector could see, because we were disclosing that there were these massive cracks in the basement, which the other inspector didn’t know. He said that even the siding was buckling, and you could tell that something was going on with the house because of the way all this stuff was.”

Because they’re not allowed to cause damage, the best inspector can miss serious problems.

“The biggest thing confronting me is that I’m a guest in somebody’s house,” says, Ont.-area home inspector. I can’t do certain things. In this house this morning, I cannot verify that there’s live knob and tube, but I have every reason to believe there is.”

The seller may be deliberately hiding problems. Here’s what to look for.

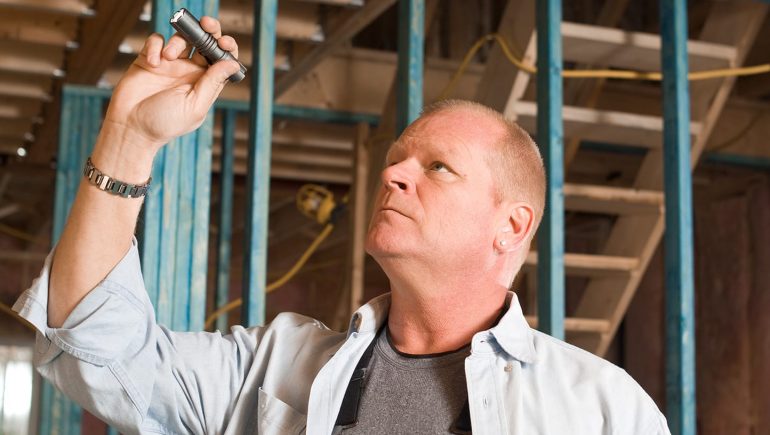
Kingston, Ont. inspector Cam Allen looks for fresh paint and fresh drywall in odd places, especially basements. “If I walk into a house, and the upstairs has been lived in, but the basement is brand-spanking new, nice and clean and everything else, you go: ‘Why was this just fixed up?’”


Smart Tips for Getting the Most Out of a Property Inspection

Well, I really just don’t like paying for an inspection, where if anything is actually wrong, I am told to “contact a qualified expert.” Whether it is foundation, electrical, or plumbing, the inspector will usually just tell me to get a quote from “a qualified expert” or get that quote themselves.

Despite the lack of clarity that comes from most inspections, they are very expensive. I have seen inspections cost $650 for a single family home and up to $30,000 for a large apartment building. In any case, that is money that could be used to actually fix the things that are wrong, or at least it seems to me.

Make sure your inspector gives you bids for the items he calls out.

This is a big one for me. If I’m going to be paying $400 or more for an inspection, then I sure as heck better be getting a quote on the work for the things that are wrong. It is important to understand as the buyer (person ordering the inspection) that any bid you get from the inspector is going to be marked up in some way. That is fine, though; you still want it.

Once you have an inspection, have a separate contractor bid out the work.

You should always, and I mean always, get two bids for work, but this is particularly true of work being done during the escrow process. In fact, you should walk the property with your contractor and ask them to bring up anything that they think may be wrong with the house.

Make sure your inspection includes sewer, plumbing, and electrical.

These are the three areas where I have been hurt worst when buying properties. Everyone gets super worried about a bad foundation, but you can usually tell a property has a bad foundation just by looking at it, and inspectors are pretty good on that item. Electrical, plumbing and sewer are more difficult because they require more work. Access to the foundation is easy – walk around the building or go into the crawl space under the house. It is far more difficult to check the wiring behind the walls or the insides of pipes.


Why You Need To Get A Pre-Purchase Home Inspection

Not getting one is like buying a used car without taking it for a test drive, or buying it based on colour. Sounds crazy, right? But think about it, when it comes to buying a house you are literally investing at least fifty times more money, and when people spend more time buying their groceries than they do getting a house properly checked by a pro, they pay for it.

You want someone who will tell you the truth about a home, even if it means walking away and not buying it

They can spot potential problems and the red flags; they can tell you which ones need to be addressed now and which ones can wait, and what it might take to make it right. Then from there, you can make an informed decision about your future and decide if the home is worth your investment

For example, during a pre-purchase home inspection, a pro will check out the roof and tell you roughly how long it should last you, if it needs to be repaired or if you’ll need to re-shingle before next winter. They’ll take a look at the building structure and foundation; check for any major cracks or issues that will have to be fixed sooner rather than later, like a heaving foundation or mould in the basement or attic.

They’ll also check out the electrical, the plumbing and HVAC (heating, ventilation and air conditioning) and warn you of any upgrades or major repairs. Because if a house needs a new furnace, or if the plumbing needs to be upgraded or there’s knob and tube wiring, believe me, you will want to know before making an offer. Those fixes aren’t cheap!

Too many times people fall in love with the eye candy – granite countertops, hardwood floors, crown-moulding, 8-foot ceilings, stainless steel appliances, etc. – and they don’t see the water damage on the ceiling, the mould in the basement or bathroom; crumbling mortar on the exterior, or the rotting framing around windows.


Questions You Need to Ask at Your Home Inspection

A home inspection is a critical part of the home-buying process, especially for first-time buyers. After a seller accepts an offer, the buyer can pay for a home inspection to find out if their dream home is really a money pit. Buyers should look for an independent inspector who is licensed and insured, look over the inspector’s report closely, and not be afraid to ask questions. We’ve come up with a list of questions worth asking your home inspector before, during, and after your potential home’s checkup.

DO I NEED AN INSPECTION?

has had one buyer who didn’t have a home inspection. That buyer bought a 1920s house that was at greater risk for lead, radon, and asbestos than most houses, so she had them sign an addendum absolving her firm of liability. VanderZanden notes that the cost of inspections, sewer scoping, and septic inspections, well-flow tests, water-quality tests, and radon tests can just add to the bill. That said, it’s less expensive to find a massive problem and walk away than it is to buy a home and encounter catastrophic problems.

WHAT DO YOU CHARGE?

an inspection can cost between $300 to $600, depending on the location and size of the house. However, even having your sewer pipes scoped can add another $125 to the bill. If there are extra fees for specific tests, make sure those are clarified early.

ARE YOU INSURED?

Generally, states require home inspectors to be bonded, but don’t require other insurance that might protect both the inspector and the client. As Coates says, insurance coverage for errors and omissions comes in handy.

WHAT IS YOUR EXPERIENCE?

Coates notes that he’s spent four years as inspector, but 25 years in home repair. While your home inspector may have basic knowledge of the inspection process, it helps when they also have some practical skills to back it up. An inspector doesn’t need a full career in home repair, but they should have training or education that homebuyers can confirm and also membership in groups like the National Academy of Building Inspection Engineers and National Society of Professional Engineers. If you aren’t sure, ask.

Pros And Cons Of Local Moving House Methods

Things You Have to Know Before Hiring Movers

Hiring movers can feel a little overwhelming. With so many moving companies to choose from, where do you even start to hire movers? Over our many moves, and with some really bad experiences combined with mostly good ones, we’ve made the task of hiring movers a little less complicated, simply from learning what we need to know before we sign on the dotted line.

Know What Type of Mover You Need to Hire

Before you start searching for a good mover, make sure you understand what type of move you’ll be making. The type of move will determine the type of moving company you should hire. You can start by understanding the difference between an interstate and intrastate move along with knowing just how far you’ll be moving—all of which will limit the type of mover you’ll need.

Do Your Research

It’s a good idea to check out at least 10 movers by researching their history, understanding the signs of a rogue moving company and by knowing exactly what details will be involved in your move. Will you be packing yourself? What kind of estimate will be best for your move?

Ask the Right Questions

Before I set-up any appointments for a mover to come see my household goods, I always interview each one over the phone. This way you can narrow down your choices to the top three and save yourself some time and effort.

Understand Mover Estimates and Know Which One Is Best for You

Estimates can be a little confusing with some companies not offering a choice between the two. While you’re interviewing the mover on the phone, ask about estimates – find out what they offer and whether that will be your best option.

Understand Mover Fees to Avoid Increased Moving Costs

One of my very first moves caught me completely off-guard when the movers’ estimate was almost double what they had originally quoted. I refused to pay until someone went over the bill of lading step-by-step. What I discovered was that there were fees charged for additional services I hadn’t anticipated. So, don’t get caught – find out what you could be charged for extra services.


Moving Day Must-Dos

  • Buy cereal, milk, and other easy breakfast items so that there’s food available the morning after moving day.
  • If you’re moving with kids, incorporate them into the moving process by giving them a special box for all their favorite things. Let them decorate the box as wildly as they like!
  • Keep a snack bin available during moving and unpacking. Load it up with water, protein bars, chips, or whatever you need to stay fueled up during your move.
  • If you’re moving with a dog, put their food and water bowl in the same room as where you put it in the old place. The more consistent you are with your dog’s routine, the less likely they are to be anxious and destroy things.
  • Keep all your moving day essentials in an overnight bag. It’ll prevent having to sift through boxes to find your laptop, toiletries, clothes, and medications!
  • Keep valuables like your Social Security Card on your person during moving day.
  • Pack the items that you’ll need most immediately in a clear plastic bin, or a designated “open first” box. Think: bed sheets, hand soap, towels, etc.
  • Take a breather! Moving day is stressful, so allow yourself some “me time” when it’s over. Watch a movie, order some pizza, or do whatever you need to relax after a long day of hard work.


Easy Moving Tips & Tricks

From purging household items to packing your belongings, moving an entire household isn’t a simple process. Fortunately, with the help of these smart moving tips and tricks, it’s about to get a wee bit easier. Here are 21 oh-so-easy moving tips and tricks that anyone can use when moving to a new home. Best of luck and happy moving!

  • Find free moving boxes at recycling drop-off points

Don’t fork over your hard-earned money for cardboard boxes. Instead, look for free moving boxes at your local recycling drop-off points. Chances are, you’ll be able to find plenty of cardboard boxes that have been tossed by neighbors. Other places to find free moving boxes include Craigslist, Nextdoor, Freecycle, book stores, liquor stores, offices and U-Haul Box Exchange – just to name a few. For more advice on finding free moving boxes, check here.

  • Reuse original boxes for electronics and appliances

Speaking of moving boxes, don’t forget to reuse your old ones. From the TV to the blender, most electronics and small appliances come delivered in cardboard boxes. If you happen to still have these boxes, we recommend reusing them for the move. Not only does this ensure that your items will fit perfectly in the box, but it also saves you from having to spend money on boxes.

  • Schedule a donation pick-up for free

Purging heavy furniture, old clothing and other household items? Try scheduling a free donation pick-up with a local charity such as Goodwill, Salvation Army or Habitat for Humanity. Having them pick up your donations will save you from having to haul everything yourself, which means you’ll have more time to focus on the move.

  • Obtain quotes from at least three different moving companies

Don’t hire the first moving company you interview. Instead, try to obtain quotes from at least three companies to compare prices and services. When interviewing a moving company, make sure they are properly licensed and insured. For more advice on what to ask your movers when interviewing them, check here.

  • Have lots of water bottles on-hand when moving

Given the sheer number of tasks involved when moving, it’s easy to forget the simple things – like the fact that you and your movers will need a lot of water on moving day (especially during the summer). So come moving day, we recommend bringing a pack of bottled water with you to the new house. Trust us – your movers will thank you.


Plan your move and try to stick to that plan

Very big step when it comes to your local move is plan. If you make a good plan and stick to it, you will make sure your move will go by smoothly. If you are moving for the first time, it might be tricky to have everything planned since you don’t have experience. In that case, feel free to ask your local moving company for help. Or if you know someone who moved recently, ask them for a piece of advice.

Write everything down

When it comes to planning your local move, you should definitely not rely on your memory. Once you see how much things there are to organize, you will see why we advise you to write everything down. Make a checklist and to do list and you will make your life easier.


Make a layout of your new home ahead of time

If you hire local movers that are charging the hourly rates, would you like them to spend hours and hours organizing furniture in your new home because you can’t decide where you want to place what. Of course not! This is why you have to create a layout at least for the big items that you have. After your movers leave, you can decide where to put anything that is smaller and miscellaneous, such as lamps or vases.

One last check up

Before you leave your home for good, you should do one last check up. Make sure to check all the drawers, cabinets etc. The worst case scenario would be if you forget something that is valuable, such as documents and jewelry, that is why you should make sure to take those with you, not even with a local movers.

Choosing And Hiring A Residential Cleaning Service

The Advantage of Using Teams for Residential Cleaning

Many residential cleaning companies start out as a one-person operation. But as your cleaning company grows and you add employees you will soon face the problem of whether you should send in a single person to clean a home or if you should send in a team. Some cleaners may prefer to work alone, but is that in the best interest of your cleaning company?

A single cleaner does all the tasks and does not have to negotiate with anyone about who will do what task or how things will get done. One person can generally clean two to three houses a day – but they may only be able to clean just one home if it is large and there’s a long drive to get to it. Teams will consist of two to four people, who are all cross-trained. Teams can clean from two to seven houses a day, which can triple the number a lone person can clean.

No matter if you pay for mileage or if you provide a company car, you will spend more money if you have single cleaners going out on jobs rather than teams. When you use teams they can pair up in a vehicle, cutting down on the cost of mileage to and from each job.

What can be a large drawback of using single cleaners is the risk that they can steal from your customers. Also, a single cleaner works directly with a customer and may have opportunities to talk to that customer alone. The customer may approach the cleaner about cutting out the middle person or the cleaner may decide there is more money to be made going at this on her own.

There are a couple of ways to get around this. One is to have your employees sign a noncompete agreement. Second, you can send teams of at least two cleaners to each home. In addition, if a single cleaner is out for the day, you may have to reschedule or have someone clean the home who is not familiar with it. In team cleaning there are several individuals who know the home and can cover the tasks of someone who is out for the day.

With team cleaning, all members of the team have specific cleaning assignments. There is also a team leader that may have added duties, such as inspecting the work and communicating with the home owner. Team members are cross-trained and tasks are rotated to cut down on employee burnout and reduce the boredom that can happen when someone is doing the same job all day long.

Another advantage of team cleaning is that your employees have others to interact with during breaks, lunch and drive time. This allows employees to get to know each other and builds team morale.

What size of team should you use? Most residential team cleaning crews consist of two people. However, some cleaners have found that three person teams are more effective if they are cleaning larger homes.

How do you break down team tasks? This will depend on the size of your team. If you have a two-person team, the work is generally divided between wet and dry work. Wet work refers to procedures used in bathrooms, kitchens and utility areas, using cleaning chemicals. Dry work includes emptying trash, dusting, and vacuuming. The person assigned to the dry work will start in the back of the house (second floor if there is one) and work their way forward towards the front door. Or, if there is a downstairs, they will work their way up to the front door.

If you have a larger team there can be more variation in the way the tasks are broken down. With a three-person team, one person can start on wet work, another does dusting and the third does trashing and vacuuming. Another way of breaking it down between three people is to have one person start on the kitchen, one in the bathrooms and the third does the dry work.


Productivity and Cost Efficiency

In today’s economic climate, cost efficiency is more important than ever. Team cleaning allows for increased productivity at a lower cost. Less equipment is required, as only one vacuum needs to be bought for the team, rather than eight vacuums bought for eight floors in a zone cleaning situation, for example.

With zone cleaning, each janitor needs to have their own cleaning tools and products, which can quickly add up.

Productivity is higher because each of the cleaning professionals specialises in one function. They are trained to work through the facility in the area they have mastered, whether it is vacuuming or trash collecting.

Often with the zone cleaning approach, some tasks are done better than others, so there are highs and lows in quality throughout the building.


What’s Zone Cleaning?

Zone cleaning is just what it sounds like— each member of the team is responsible for completely cleaning a designated area, aka zone. One team member is completely in charge of their zone, from top to bottom. Every detail will be under their domain.

Pros: If there are issues with an employee, it becomes immediately visible to the supervisor. When one specific employee is in charge of a zone, and that zone’s cleaning is subpar, they know that the employee requires additional training. If your building has particular security concerns, it will minimize the number of cleaners who have access to designated areas. Should something go missing or a door be left unlocked, you’ll immediately know the culprit.

Cons: It can get pricey to outfit the whole team with all the equipment required for thoroughly cleaning several different zones. If you’ve got five members of the team, you’ll be purchasing five vacuums, five sets of cleaning fluids and supplies, etc. It’s possible that using a different cleaner per zone could result in wildly erratic results if the cleaning company doesn’t use a careful training process.


Tips To Find Best House Cleaners

  • Most house cleaning companies are boasting that they are being screened by police. You need to see proof of that. You need comparisons to see too. I’d also try these out too-they might be incorrect.
  • You need peace of mind that if they ruin one of your costly ornaments by mistake, they are covered to cover the cost. Test they are safe in case of unintended injury.
  • Your cleaner will have a nice but not too nice attitude. You also learn about cleaners wasting much of their daily chatting and consuming tea. They should be nice, but polite too, so they should get on with their work.
  • A marginally better cost may be worthwhile charging. Then you will claim excellent service. If you make a cheap choice, you might just get shoddy work.
  • Why not continue the cleaning prices online with your study. Many housekeeping companies include a website. Ask a chart of rates for its facilities. You are also discreet in this manner and should thus not be’ lulled’ into traveling with them.


Home Cleaning Service – Getting Your Space Ready

A home cleaning service is something everyone looks forward to. It means someone else will come in and do the dirty work. But to give the professionals enough time to have a thorough cleaning for everything, you and your family need to make sure the house is ready to go

Decide on the Tables

Does your home cleaning service involve changing bedside sheets? If so, consider taking the dirty sheets and throwing them in the dirty clothes in advance. There’s no need for you to look around and find out what you want on the bed if you have the fresh sheets spread out on the mattress. This saves some time and makes sure all of the house’s beds are fresh and clean.

Get Off the Floor

Think about how long it takes you to pick up all the toys the children leave on the floor, or the clothes that just don’t seem to hamper the dirty clothes. Now imagine you pay somebody to clean up after your children. Would you rather spend your time picking up after everyone, or tackling the children’s bathroom, the home cleaning services professionals? Have everyone collaborate to ensure the floors are clear and free of clutter. Clothes should be put away and toys in place. That also makes vacuuming the floors easier. Everything you do in advance allows you to go to the home cleaning service more for the difficult jobs you are leaving.

The Cuisine

It goes without saying that before the home cleaning service professionals come in the kitchen needs to be cleaned a little bit. No need to clean the oven or microwave, and scrubbing is not required. You do want to make sure, though, that all the dishes are out of the sink and all the food is put away. Again, this is a boring job that can be taken care of by the family before professionals arrive. Loading the dishes into the dishwasher takes just a few minutes, and clearing off the counter tops.

Drywall Repairs Damage

Causes Of Drywall Damage

Fixing drywall can be a headache for a homeowner. Though you don’t have to fix the damage yourself, you still have to worry about it reoccuring

Plumbing Leaks

One of the leading causes of broken drywall is water damage. If your plumbing is older or has been improperly installed you may run into some major issues further down the road. One of these is water damaged drywall.

Poor Fastening

When your drywall was installed it was most likely attached via joint fastening tape. As time goes on, this thick tape can loosen due to moisture or age, and start to buckle the drywall it’s holding together. This will show up very obviously in your walls.

Cracking

Cracks can happen in poorly installed drywall. It most often occurs in ceilings. The moment a crack is noticed, you should absolutely contact an expert to come and repair the damage. Cracked drywall is a safety issue. If you notice cracking happening often, you should have your roof inspected. Sometimes it is also caused by your house settling.

Termite Damage

Termites are a major issue for lots of homeowners. If you notice termite damage immediately call an exterminator. Termite damage can be identified by pinholes, a hollow sound when you strike the wall, damaged paint and wood damage.


How to patch drywall.

I’d like to rephrase that.  Classifying my kitchen renovation as an “event” seems wrong.  A bit of a narcissistic  exaggeration, heh.    It would be more appropriate to say the renovation has been an ass pain undertaking.  The completion of it will be an event!  Complete with contortionists and ponies if I have my way.

I’ve had to hire only 4 people to do things around my house in the past 5 years or so.   The nice man Tim who unclogged my pipes, Dave who did my electrical work, Grant who is installing my kitchen and Kyle … who drywalled my ceiling.  None of those phrases are euphemisms.

All of these were jobs I couldn’t do myself.  I tired to fix my plumbing but wasn’t successful, I tend to shy away from elaborate electrical work or anything that might kill me if done incorrectly, and I don’t have a clue about how to hang cabinets in  a house that has walls that look like you’re seeing them through a funhouse mirror.

Drywalling on the other hand I can do.  What I can’t do is drywall a ceiling.  I’m too little, drywall is too big and it brings out the swear words in me.  Words like snarklefart. So in the spirit of “Save and Splurge” I hired Kyle to drywall the ceiling, while I did all the other drywalling that needed to be done in the kitchen.  If it wasn’t on the ceiling, I was doing it

I know. Drywalling scares people. Putting nail holes in it scares people, knocking a hole in it scares people and putting anchors into it scares people


HOW TO PATCH DRYWALL

It’s inevitable. No matter how careful you are, holes in your drywall are going to happen. Fortunately, no matter how extensive the damage, it is fixable.

Step 1: Cut a Square Around The Damage

Cut the hole into a square or rectangular shape using a keyhole saw. Now cut a replacement piece of drywall 2″ longer and 2″ wider than the hole you just made. Use a tape measure to make it the right dimensions.

Step 2: Make a Patch

Create a patch to fill in the hole. Lay the replacement piece of drywall on a flat surface with the backside facing up. Measure in 1″ from all four edges and draw a line using a pencil. This should form a shape the size of the hole. Using a straight edge and utility knife, cut through the backside paper and the drywall gypsum. Do not cut the front-facing layer of paper. Using a putty knife, peel away the backside paper and gypsum layer. Be careful not to tear the front-facing paper. The smaller part of the patch should fit into the hole. The paper edge should extend 1″ beyond the hole.

Step 3: Apply Joint Compound

Apply a thin layer of joint compound around the hole. Place your patch into the hole. Using a putty knife, work the paper edge down into the compound. Feather the edges of the compound and allow it to dry. Sand lightly with a fine-grit sandpaper and apply a second layer of joint compound to finish the repair.

PATCH LARGE DRYWALL HOLES (6″ TO 12″)

Step 1: Square Off the Hole

Use a keyhole saw to form the hole into a square or a rectangle. Holes up to 12” require a slightly different repair that provides more support than smaller holes.

Step 2: Create a Patch Larger Than the Hole

Cut a piece of drywall that’s 2” larger than the hole to be repaired. Using a drill, create two small holes through this piece of board, feed some string through and tie both ends of the string to a stick (tie in the middle). Allow for about 8″ of string between the board and the stick. The “stick side” of the board will be the front. The stick will be used to hold the patch in place. By twisting the stick, it applies pressure to the rear of the board to steady it in the hole.

Step 3: Place the Patch

Place the patch by first applying a smooth coat of cement adhesive around the edges of the piece of wallboard material. Insert the patch into the hole and position it so the cement adhesive firmly grips the solid area around the rear of the hole. Turn the stick clockwise, twisting the string and increasing pressure against the patch board at the rear of the hole. This will hold the board firmly in place until the cement adhesive dries.


Steps to a Permanent Fix with 3M Patch Plus Primer

Do you have a crack in your drywall that keeps coming back? Today’s post will help you fix this annoying problem in easy steps using 3M’s Patch Plus Primer.

This weekend I was cleaning out the guinea pig cage that sits in our living room (did you know guinea pigs can live from 5 to 8 years, what the!!!) and noticed a crack in our wall under the window. Apparently the previous homeowners tried to fix it since there was evidence of old joint compound around the crack.

Dealing with old rental homes has taught me a thing or two about drywall and plaster. After reading this post I guarantee you’ll be able to permanently fix any drywall crack in no time.

Apply Fiberglass Mesh Tape to Your Drywall Crack

One of the biggest mistakes anyone can make is to just add joint compound or spackling to the drywall crack. Over time the crack will come back because the compound or spackling will never win the fight between it and your house settling

Add a Thin Coat of Patch Plus Primer to the Drywall Tape

3M Patch Plus Primer is great for repairing cracks or holes in drywall because it doesn’t require a primer coat like traditional joint compound


Can I fill a drywall hole with something and reuse the hole?

I made a mistake with drilling a hole in the drywall. It’s off by about 1/4-1/2 inch. The new hole will be really close to the old hole, or knowing my poor drilling skills, it will overlap the old hole. Someone told me I can use joint compound or something to fill the hole and reuse the hole. However, when I went to OSH, the worker said structurally, we can’t refill a hole and reuse it and that the screw/anchor will eventually get loose and fall out.

Is my friend correct that I can reuse the hole or is the worker correct that structurally we can’t reuse the hole? EDIT: I’m trying to drill holes for screw to hold a curtain rod and use anchors in the drywall. The anchors are the plastic anchors that came with the curtain rod set. I don’t think the rod and curtains weigh that much but the store worker said the filled in drywall won’t be as strong as untouched drywall.

I didn’t measure the line or drill the hole correctly b/c one of the end brackets holding the rod is like 1/4-1/2 inches too low (stupid me). I COULD move it out (or in) 1-2 inches to the left or right but then it doesn’t look symmetrical, which is why I want to just fill the holes and re-drill a hole 1/2 inch up to line everything up but if the filled in hole won’t hold the anchor, then that won’t do

Joint compound usually bonds fairly well to the gypsum inside drywall panels. However, you must get it thoroughly filled to make good contact. Also, standard joint compound shrinks substantially, so you’d be better off with a setting-type product

If you press the compound in adequately and let it dry or cure fully, you’ll be able to drill a new hole at the correct location. You’ll want to start with a small, sharp bit to be sure that it doesn’t “walk”, or shift position. Anchor your drill well to help with this.